Price and delivery time on request
Self-lubricating Wrapped bearingCorrect measurement
Choosing the appropriate measuring methods for wrapped bearings depends on factors such as the type of component and the specific requirements of the machinery. It’s important to follow the manufacturer’s guidelines or seek guidance from a qualified professional when selecting a measuring method to ensure accurate and reliable results.
At VIIPLUS, we offer a wide range of self-lubricating wrapped bearings and bushings, designed to provide optimal performance and longevity in harsh operating conditions. Contact us to learn more about our products and how we can help you with your machinery needs.
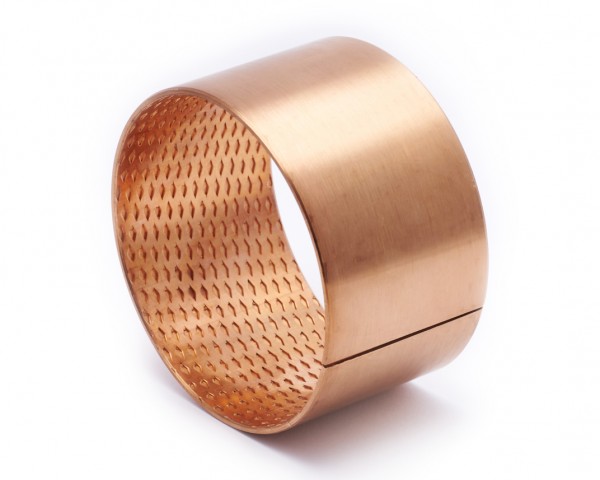
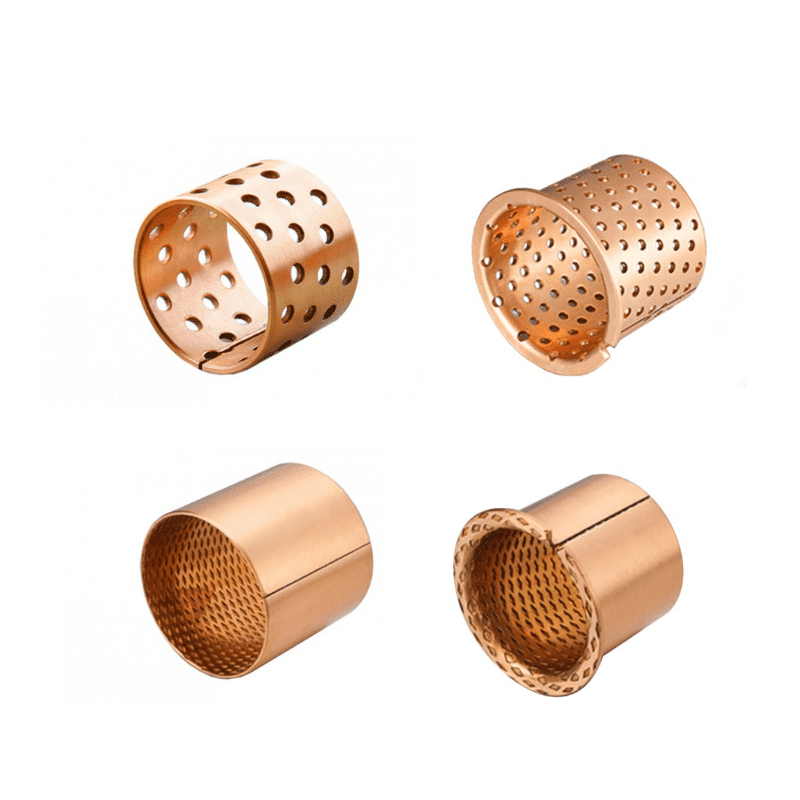
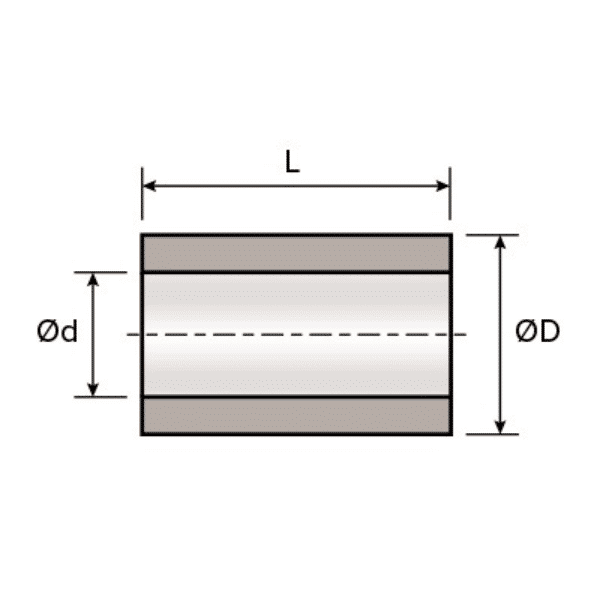
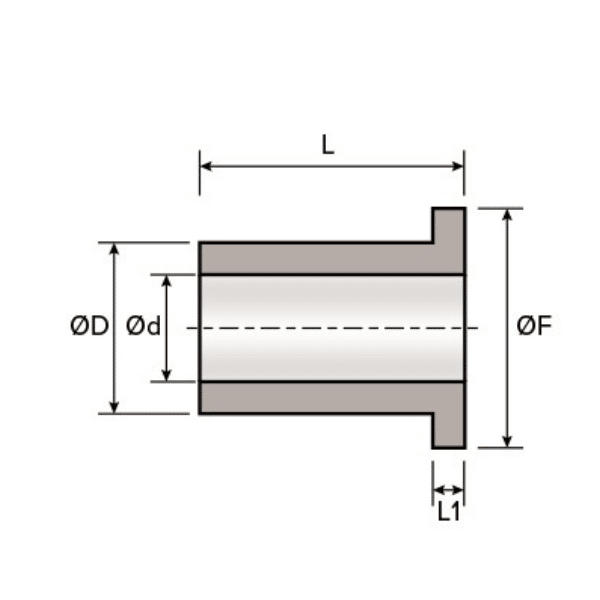
Measuring Wrapped Bearings: A Guide
Wrapped bearings, also known as plain bearings or sleeve bearings, are essential components in many types of machinery. Over time, these bearings may wear or become damaged, leading to reduced performance and increased maintenance costs. Measuring wrapped bearings can help identify wear and damage early, allowing for timely repairs and replacements.
To measure a wrapped bearing, follow these steps:
-
Remove the bearing from the machinery: Before measuring the bearing, it must be removed from the machinery. Follow the manufacturer’s instructions or seek guidance from a qualified professional to ensure proper removal.
-
Clean the bearing: The bearing should be cleaned using a suitable cleaning agent to remove any dirt or debris that may interfere with the measurements.
-
Measure the inner diameter: Using a micrometer, measure the inner diameter of the bearing at several points along its length. Record the measurements and calculate the average.
-
Measure the outer diameter: Measure the outer diameter of the bearing at several points along its length using a micrometer. Record the measurements and calculate the average.
-
Measure the width: Using a caliper, measure the width of the bearing. Record the measurement.
-
Assess the wear and damage: Compare the measurements obtained to the manufacturer’s specifications for the bearing. If the measurements fall outside the acceptable range, the bearing may be worn or damaged and should be replaced.
It’s important to note that measuring wrapped bearings requires precision and accuracy. If you’re unsure of how to properly measure a wrapped bearing, seek guidance from a qualified professional. With proper maintenance and regular measurements, wrapped bearings can help ensure optimal performance and extend the lifespan of machinery.
Measuring Wrapped Bushings: Inspection Methods
Wrapped bushings, also known as sleeve bearings or plain bearings, are an essential component in many types of machinery. It’s important to periodically inspect these bushings for wear and damage to ensure optimal performance. Here are some common inspection methods for measuring wrapped bushings:
-
Pressure Test: The pressure test inspection method involves using two semicircular inspection molds and a calibration mandrel to calibrate the zero position. The bearing slit is then placed on top of the inspection mold, and the two mold halves are brought together with an inspection load (Fch). The reading device measures the distance that the inspection mold moves down, which can be used to assess the condition of the bushing.
-
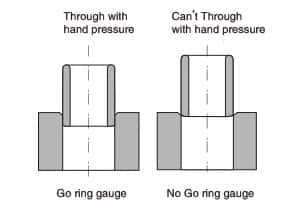
Ring Gauge Testing Method: The ring gauge testing method uses through and stop ring gauges. The bushing is pushed in and passed through the through ring gauge by hand (maximum force of 250N). Under the same force, the stop ring gauge cannot be entered. Note that in some cases, such as if the wrapped bushing is not round or if the seam is too large, the inspection accuracy may be affected.
-
Tape Measure: For larger wrapped bushings, a tape measure can be used to measure the outer diameter. To do this, a measuring tape is used to follow the bearing 360° on the centerline of the bushing’s width, and sufficient tension is applied to close the opening. The measuring tape is calibrated around a positioning mandrel whose outer diameter is equal to the nominal outer diameter of the bushing (Do). The indicating device is placed on the free end of the measuring tape and adjusted to the calibrated size. After the bushing inspection is completed, the reading of the circumference indicating device should be the difference between the measured value of the bushing and the calibration value of the positioning mandrel. From this, the outer diameter of the bushing can be calculated.
It’s important to note that these inspection methods require precision and accuracy. If you’re unsure of how to properly inspect a wrapped bushing, seek guidance from a qualified professional. With proper maintenance and regular inspections, wrapped bushings can help ensure optimal performance and extend the lifespan of machinery.


Methods for Wrapped Bearings Online
Wrapped bearings, also known as plain bearings or sleeve bearings, are an essential component of many types of machinery. Proper maintenance and regular inspections of these bearings can help ensure optimal performance and extend the lifespan of machinery. Here are some checking methods for wrapped bearings that you can utilize online:
-
Manufacturer’s Resources: The manufacturer of your wrapped bearings may offer resources such as manuals, technical specifications, and online support for maintenance and inspections. Check their website or contact their customer support for more information.
-
Online Forums and Communities: There are many online forums and communities dedicated to machinery and engineering topics, including wrapped bearings. These forums are a great resource for asking questions and getting advice from experts in the field.
-
Video Tutorials: Many websites and platforms offer video tutorials on machinery maintenance and inspection, including wrapped bearings. These tutorials can provide step-by-step instructions on how to properly inspect and maintain your bearings.
-
Online Calculators: To ensure the proper size and fit of your wrapped bearings, you can use online calculators that are specifically designed for this purpose. These calculators can help you determine the correct bearing size based on your machinery’s specifications.
-
Online Retailers: If you need to purchase new wrapped bearings or replacement parts, online retailers can provide a wide range of options and information on the products they offer. Some retailers may also offer resources and support for maintenance and inspections.
It’s important to note that while these checking methods can provide valuable information and resources for maintaining and inspecting wrapped bearings, it’s always best to seek guidance from a qualified professional if you’re unsure of how to properly inspect or maintain your machinery. With proper maintenance and regular inspections, wrapped bearings can help ensure optimal performance and extend the lifespan of machinery.
Choosing an Inspection Method for Bearing Inner Diameter
Proper maintenance and regular inspections are crucial to ensuring the optimal performance of bearings. When it comes to inspecting the inner diameter of bearings, there are various methods to choose from. Here are two common inspection methods for bearing inner diameter:
-
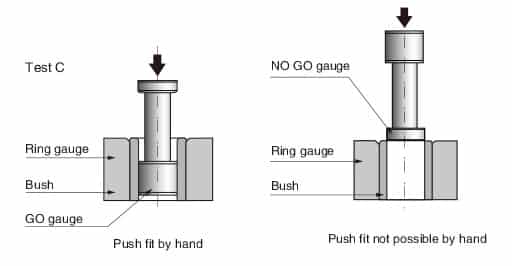
Plug Gauge Testing Method: The plug gauge testing method involves pressing the rolled bearing into the H7 median ring gauge and using a plug gauge to detect the inner diameter of the bearing. This method is relatively simple and straightforward and can provide accurate measurements if executed correctly.
-
Wall Thickness Micrometer Detection Method: The wall thickness micrometer detection method involves using a wall thickness micrometer to detect the wall thickness of the bearing and indirectly calculate the bearing inner diameter. It’s important to note that according to DIN1494-2, the bearing wall thickness and inner diameter cannot be marked on the drawing at the same time.
Choosing the appropriate inspection method depends on factors such as the type of bearing and the specific requirements of the machinery. It’s important to follow the manufacturer’s guidelines or seek guidance from a qualified professional when selecting an inspection method to ensure accurate and reliable results.
At bronzelube.com, we offer a wide range of solutions for bearing maintenance and inspections. Our team of experts can provide guidance and support to help you choose the appropriate inspection method and ensure the optimal performance of your bearings.
Self-Lubricating Wrapped Bearings and Bushings: Inspection Methods for Inner and Outer Diameter
Self-lubricating wrapped bearings and bushings are an essential component in many types of machinery, providing support to rotating shafts and reducing friction between moving parts. Proper maintenance and regular inspections of these bearings and bushings can help ensure optimal performance and extend the lifespan of machinery. Here are some inspection methods for measuring the inner and outer diameter of self-lubricating wrapped bearings and bushings:
-
Outer Diameter: To measure the outer diameter of a self-lubricating wrapped bearing or bushing, a tape measure can be used to measure the circumference. Use a measuring tape to follow the bearing or bushing 360° on the centerline of the bearing or bushing’s width, and apply sufficient tension to close the opening. The measuring tape is calibrated around a positioning mandrel whose outer diameter is equal to the nominal outer diameter of the bearing or bushing. The indicating device is placed on the free end of the measuring tape and adjusted to the calibrated size. After the inspection is completed, the reading of the circumference indicating device should be the difference between the measured value of the bearing or bushing and the calibration value of the positioning mandrel. From this, the outer diameter of the bearing or bushing can be calculated.
-
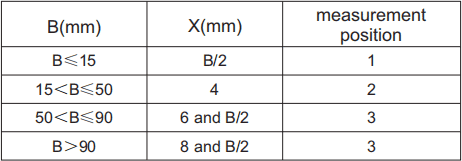
Inner Diameter: To measure the inner diameter of a self-lubricating wrapped bearing or bushing, the plug gauge testing method can be used. Press the rolled bearing or bushing into the H7 median ring gauge and use a plug gauge to detect the inner diameter of the bearing or bushing. Another method is the wall thickness micrometer detection method, which involves using a wall thickness micrometer to detect the wall thickness of the bearing or bushing to indirectly calculate the bearing or bushing’s inner diameter. Check the wall thickness in at least 3 radial positions.
At VIIPLUS, we offer a wide range of self-lubricating wrapped bearings and bushings in both metric and inch sizes. Our products are made in China and are designed to withstand harsh operating conditions while maintaining optimal performance. Contact us to learn more about our products and how we can help you with your machinery needs.
Find the correct measurement method of wrapped bearings outer & inner diameter online. Contact Now!
Checking and Measurement Methods for Thrust Pieces, Plain Bearings, and Wrapped Bearings
Proper maintenance and regular inspections are crucial to ensuring the optimal performance and lifespan of thrust pieces, plain bearings, and wrapped bearings. Here are some checking and measurement methods for these components:
-
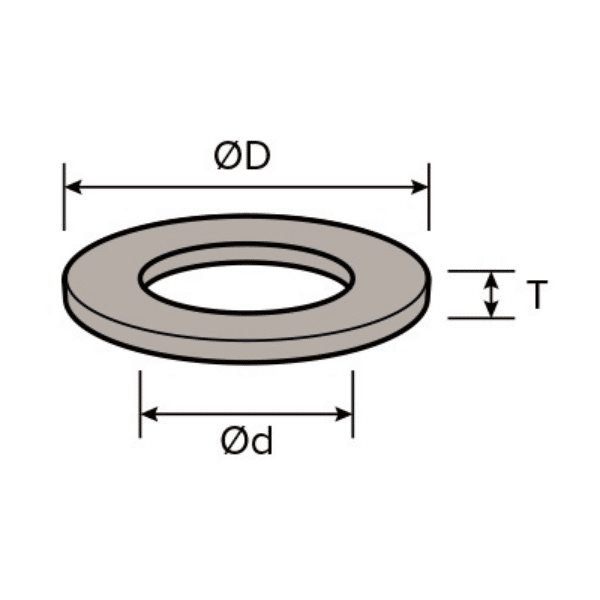
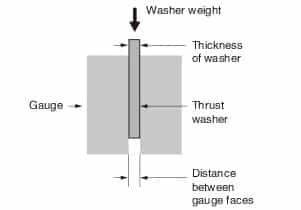
Thrust Piece Measurement Method: In addition to the thickness tolerance, the parallelism of the gasket is equally important for the service life of the gasket and the wear part. We use a more effective inspection method to detect the parallelism of the gasket, and let the gasket pass through two parallel blocks by its own weight. Of course, the parallel block must be larger than the specification of the gasket itself.
-
Plain Bearing Measurement Method: To measure the size and fit of plain bearings, the plug gauge testing method can be used. Press the rolled bearing into the H7 median ring gauge and use a plug gauge to detect the inner diameter of the bearing. Another method is the wall thickness micrometer detection method, which involves using a wall thickness micrometer to detect the wall thickness of the bearing to indirectly calculate the bearing’s inner diameter. Check the wall thickness in at least 3 radial positions.
-
Wrapped Bearing Measurement Method: To measure the size and fit of wrapped bearings, a tape measure can be used to measure the circumference. Use a measuring tape to follow the bearing 360° on the centerline of the bearing’s width, and apply sufficient tension to close the opening. The measuring tape is calibrated around a positioning mandrel whose outer diameter is equal to the nominal outer diameter of the bearing. The indicating device is placed on the free end of the measuring tape and adjusted to the calibrated size. After the inspection is completed, the reading of the circumference indicating device should be the difference between the measured value of the bearing and the calibration value of the positioning mandrel. From this, the outer diameter of the bearing can be calculated.
Choosing the appropriate checking and measurement methods depends on factors such as the type of component and the specific requirements of the machinery. It’s important to follow the manufacturer’s guidelines or seek guidance from a qualified professional when selecting a checking or measurement method to ensure accurate and reliable results.
At VIIPLUS, we offer a wide range of self-lubricating wrapped bearings and bushings, as well as thrust pieces and plain bearings. Our products are designed to withstand harsh operating conditions while maintaining optimal performance. Contact us to learn more about our products and how we can help you with your machinery needs.
Measuring Methods for Dimensional and Running Accuracy of Wrapped Bearings
Proper measuring of the dimensional and running accuracy of wrapped bearings is essential for ensuring optimal performance and longevity of machinery. Here are some key considerations when selecting measuring methods for these components:
-
The Free State of the Wrapped Sleeve: The wrapped sleeve is not a so-called cylinder in the free state due to the gap. Therefore, when measuring the outer diameter and inner diameter of the wrapped sleeve, it is important to consider the gap.
-
Press Fitting the Shaft Sleeve: When the wrapped shaft sleeve is press-fitted to the bearing seat, the gap will be tightly closed due to the interference fit. This tight fit ensures that the entire shaft sleeve fits tightly with the bearing seat, and the inner diameter/outer diameter cannot be accurately measured.
-
Special Gauge for Measuring: To accurately measure the outer diameter and inner diameter of the wrapped shaft sleeve, the shaft sleeve must be pressed into a special gauge in advance to allow the gap to be closed before measurement. This gauge ensures that the sleeve is in the correct position and allows for accurate measurements of the dimensions and running accuracy of the sleeve.
Measuring Wrapped Bushing Bearings: Key Considerations Key Considerations
Measuring Wrapped Bushing Bearings: Key Considerations Key Considerations
Proper measuring of wrapped bushing bearings is essential for ensuring optimal performance and longevity of machinery. Here are some key considerations when measuring wrapped bushing bearings:
- The Importance of Measuring: Measuring the dimensions and tolerances of wrapped bushing bearings is critical for ensuring the correct fit and function within the machinery. Proper measurements can help identify potential issues and prevent costly breakdowns and downtime.
- Measuring Outer Diameter: To measure the outer diameter of a wrapped bushing bearing, a tape measure can be used to measure the circumference. Use a measuring tape to follow the bearing 360° on the centerline of the bearing’s width, and apply sufficient tension to close the opening. The measuring tape is calibrated around a positioning mandrel whose outer diameter is equal to the nominal outer diameter of the bearing. The indicating device is placed on the free end of the measuring tape and adjusted to the calibrated size. After the inspection is completed, the reading of the circumference indicating device should be the difference between the measured value of the bearing and the calibration value of the positioning mandrel. From this, the outer diameter of the bearing can be calculated.
- Measuring Inner Diameter: To measure the inner diameter of a wrapped bushing bearing, the plug gauge testing method can be used. Press the rolled bearing into the H7 median ring gauge and use a plug gauge to detect the inner diameter of the bearing. Another method is the wall thickness micrometer detection method, which involves using a wall thickness micrometer to detect the wall thickness of the bearing to indirectly calculate the bearing’s inner diameter. Check the wall thickness in at least 3 radial positions.
We offer a large selection of graphite copper sleeve and flange bushing.
MAINTENANCE Self-lubricating flange bushing, highly durable, and reliable bushing supplier with or without graphite plugged. Learn more!
CUSTOM-MADE STANDARD PRODUCTS
Learn More


